How to Make a Blurry Picture Clear Photoshop
Have you ever wondered how professional photographers get that blurry background effect in their shots ? The background blur, or bokeh, is most likely the result of finely tuned camera settings creating the perfect depth of field, isolating the subject of the photo and producing a hazy effect in behind. A professionally blurred background can also be achieved using an expensive telephoto lens that closes the distance between the photographer and the subject, or a macro lens that is mostly used for close-up photography. But you don't have to be a professional to create the same background effect on your photos. You can blur backgrounds in PicsArt. And it's really easy to do.
Why Blur Photo Backgrounds?
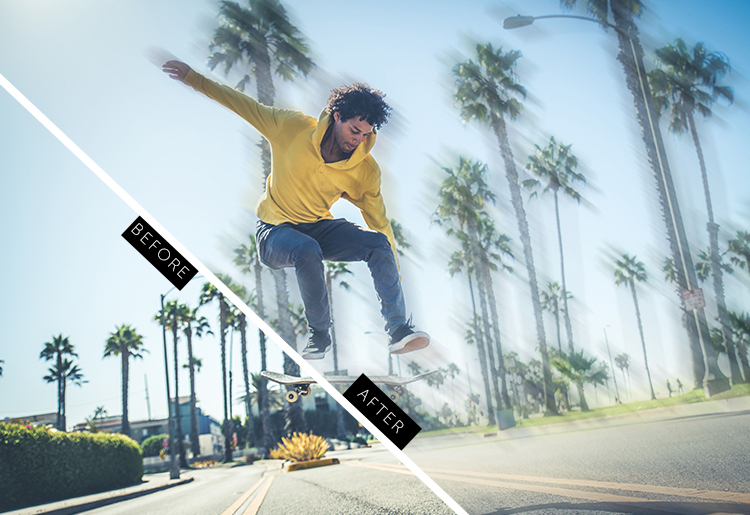
There are so many reasons for wanting to blur the background of your photo, or blur a photo in general. If you're just getting into photography then a blurred background can lend a professional look to your work, it can help the viewer to focus on the subject of the shot, cover up a busy background, or add drama and flair to an otherwise basic image. As you can see by the example below, a blurred photo background can add an eye-catching feeling of dimension and movement to your photography.
How Do You Blur the Background of a Picture?
Using the intuitive PicsArt blur tool , you too can create high quality, professional photos in just a few steps, no matter how experienced (or inexperienced) a photographer you are. PicsArt can help you create a blurred background on any of your photos. Follow the steps below to learn how.
1. Upload Your Photo
Upload your image to PicsArt. You can also choose one from the #FreeToEdit library to experiment with different backgrounds and textures before diving into your own creation.
2. Apply the PicsArt Blur Tool
Scroll through the editor panel at the bottom of your screen and tap on the Effects icon. Find and tap on the Blur tool . To start, select basic Blur.
You will notice various blur effect options , including a typical all-over Gaussian blur. Focal zoom lets you adjust the focus of your photo by selecting the area that should remain sharp while the background is blurred. Motion blur gives your photo a sense of movement, energy, and action. Radial blur creates a circular motion effect on your photo, with a focus on the center. Play around with all of them to see which one works best for your needs.
3. Erase the Subject
Tap on the eraser icon at the top of your screen and glide it across the image to reveal the subject of the photo. Zoom in to get as close to the borders of the subject as possible. You can also adjust the size, opacity, and hardness of the eraser brush, to get the perfect background blur effect .
Focus attention to the subject of the photo by isolating the background, the person, the face, or the hair in the photo. Once you select the area you'd like to focus on, select Invert to switch where the blur effect displays.
4. Apply Changes
Once you like the way your photo looks, click Apply at the top right of your screen to make sure changes are made to your image. You may still modify your work at this point, but be sure to apply your changes with each step to save your modifications.
5. Save and Share
Now you're ready to save your image or post it to the PicsArt community. You can also share your content through Instagram, WhatsApp, iMessage, or email. If you prefer to keep it to yourself, you can upload it privately by using PicsArt to store the file, or download it to your device.
How to Get the Bokeh Effect
Have you ever wondered how to give the background of your photos that magical bokeh blur you see in professionally edited photography ? Bokeh literally translates to 'blur' in Japanese. But photographers and photo editors know it as the effect where the lights in the background of a photo are softened and blurred to create a dreamy, glowing aesthetic.
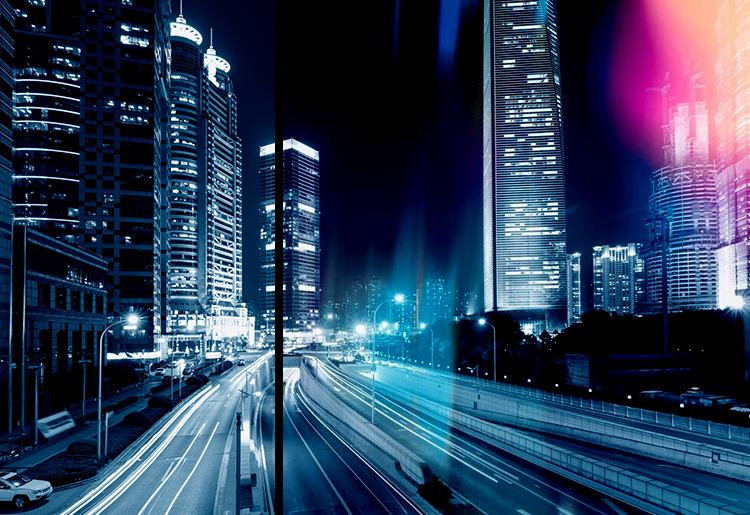
The bokeh blur effect is ideal for both daytime and nighttime photos. When you apply a bokeh blur effect to a daytime shot, it creates an ethereal, filtered look. When you apply it to a nighttime shot, it can either soften harsh, well-defined lighting, or make the lights and colors in your background pop for an edgy, futuristic look. Try to add a bokeh effect to a nighttime cityscape photo to see the tool in full flow.
Creating a bokeh background or a bokeh effect with PicsArt is super simple. Scroll through the editor panel at the bottom of your screen and tap on the Mask icon. Find and tap on the Bokeh tool. You will find many bokeh effect options, including the standard circular-shaped bokeh blurs plus a variety of different shapes and effects, such as hearts and motion blurs. Once you select the effect you want, you can keep customizing your bokeh by selecting where it goes, its opacity (or how intense it is), and its hue, which changes the color of the photo.
You'll notice that selecting a bokeh effect will apply the effect over your photo. This is a cool look, but can also erase parts of the effect to keep the bokeh blur in the background. Simply tap on the eraser tool at the top of your screen and glide it across the parts of your image you don't want the effect to appear on. Just like with the background blur , you can zoom into the photo to make sure you get every bit of bokeh off the subject of your photo.
How to Create Bokeh From Your Computer
Want to expand your editing horizons and take things to desktop? Try the PicsArt Web Editor to save your edited image directly to your computer.
1. Upload Your Photo
Click on the Upload button at the top of the left side navigation panel to upload your photo to PicsArt from your computer. You can also use the search function to find and experiment with a selection of stock images courtesy of PicsArt.
2. Choose Your Bokeh Effect
Click to select the bokeh effect of your choice from dozens of options in the left side panel.
3. Adjust or Blend
Click on Adjust at the top of your screen to modify your selected bokeh effect by increasing or decreasing the layer's opacity, hue, saturation, and contrast to achieve your desired look. Click on Blend to strike the right balance between the bokeh and the original image.
4. Download Your Photo
Once you're ready to save your final edit, click on Download at the top right of your screen to save the image to your computer.
How Do You Make a Blurry Picture Clear?
Have you ever taken the perfect picture only to later scroll through your photo album to discover a series of out of focus images? If so, then you've come to the right place. PicsArt has many ways to make blurry, out of focus pictures clear, so you can (almost) always salvage a bad shot.
Go for the HDR Effect
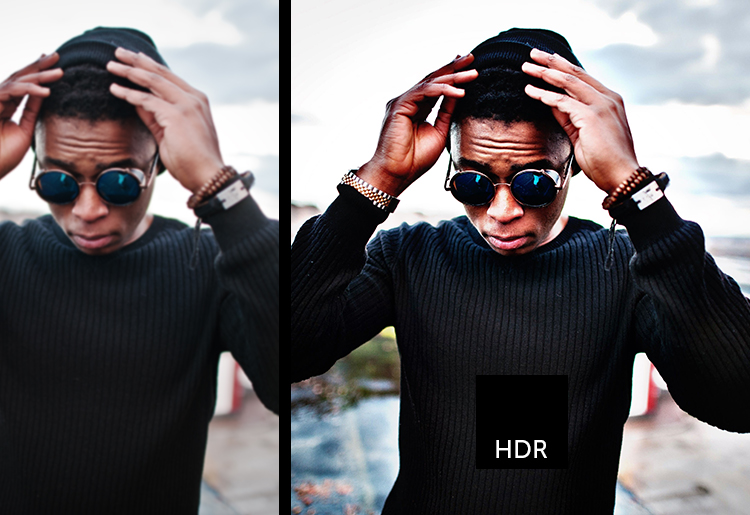
This is a basic tip, but it's such an important effect to have in your photo editing arsenal. Don't underestimate the power of subtle sharpening on your otherwise blurry photo. Simply select your photo and tap on the Effects icon in the editor panel at the bottom of your screen. Tap to select the HDR effect.
HDR typically enhances the light and contrast of a photo. You'll notice your image will take on a sort of high-contrast, 3D look with this effect. Tap on the HDR option again to reveal additional editing options. Move the Blur slider to adjust the crispness of the shot. You'll notice it doesn't take much sliding to get rid of the glow of a blurry image. You can also move the Unsharp slider from left to right to adjust sharpness and emphasize some of the details that aren't so clear.
You can leave the Saturation and Fade sliders as they are, but increasing the Fade on your photo will give you a more muted effect. It basically desaturates and softens the black and colors in your image. Decreasing fade will enhance color and contrast, resulting in a sharper shot.
Or Play With the Crisp Effect
The Crisp effect adds intensity and high drama to photos, but it can also enhance the sharpness of your out of focus pictures to intensify the details, similar to the way the HDR effect does. Simply open up your photo to start editing. Next, tap on the Effects icon in the editor panel at the bottom of your screen and scroll through the options to find and select the Crisp effect from the FX section. You'll see that the contrast and saturation of your photo become intensified. Tap on the Crisp effect again to reveal the Fade adjuster. Adjust the Fade to your desired intensity to increase or decrease the impact of the effect.
There you have it. Hopefully these tips on creating a blurred background using PicsArt tools and effects will help you achieve the professional-looking photos you always wanted. And you don't have to stop there. There are all kinds of fun edits you can apply and ways to change the backgrounds of your images, so feel free to experiment. Every image is a playground for your imagination.
Make Awesome
PicsArt all-in-one Photo and Video Editor, Collage, and Sticker Maker is the world's largest creative platform with over 150 million monthly active creators and influencers. PicsArt has collaborated with major artists and brands like The Jonas Brothers, Gwen Stefani, Maroon 5, Lizzo, Meghan Trainor, One Direction, MONSTA X, Warner Bros. Entertainment, iHeartMedia, Condé Nast, and more. Download the app today to level-up your photos and videos with thousands of quick and easy editing tools, trendy filters, fun stickers, and brilliant backgrounds. Unleash your creativity with PicsArt and upgrade to Gold for awesome premium perks.
How to Make a Blurry Picture Clear Photoshop
Source: https://picsart.com/blog/post/how-to-blur-the-background-of-a-photo